I cut the rails down, now I've decided to add some ribs and a stringer - the skin is just too "flexy" as it is. At least on the 7'6" hybrid. On the fish, I might still try to get away without ribs.
the bottom felt a bit too flexy, so I painted it with some polyurethane resin I had on hand, to see if it would stiffen up. It did, so I'm undecided if I'll glass the inside too, or just the outside.
Instead of using a bunch of clamps, I screwed the bottom plank to the rails...until the glue dried. Then I took the screws out, and filled the holes with putty.
My next board is going to be a hybrid funboard shape. I have sketched it out here, along with some notes and ideas - but like most my stuff, the actual construction process will be worked out as I go along. Yep, I make it up as I go. Also called "faking it" hahaha!
BOB Hawke's granddaughter and climate change champion, Sophie
Taylor-Price, will discuss growing threats to waves and ocean conservation
when she opens an...
The last big thing to do is the bottom fill and hot coat. It's like doing
the top. I start by sanding the laps and any high spots. Then I tape off
the r...
This board is a Neale Taylor tunnel fin.
Neale Taylor ran
Taylor's Boatshed at Woy Woy on the
NSW Central Coast.
Where Fishermans wharf is today.
These ...
Written by:Emma Allison on 21/03/2015
Damascus Steel and Carbon fiber
Blade smiths in medieval Syria used a special steel ingots imported from
India alon...
Hi fellow surfers. I'm an Australian who just turned 59, having surfed a
fibreglass board since 1971. As I have aged, I've continued to surf.
Since I tur...
I was on the lookout for a cheap light epoxy longboard for myself for
travel and for my youngest daughter to learn on. I picked up a Meyerhoffer
9'2" in a ...
Clean day at the Cap Sim
6'1 Hull quad bottom turn
Sylvain testing the 5'1 mini simmons quad
Après une longue pause pour cause de travaux, bientôt quelle...
Time to move back to the wings. A couple of major steps needed to be taken
to start to get a real feeling of accomplishment. First, the center wing
halve...
Bring your old surf junk to Leucadia this Saturday and sell it to your
fellow surfboard enthusiast.
RSVP on Facecbook
Here is our posting on Craigslist...
Après un an de tournage à travers le monde, et plusieurs heures de bandes
8mm, Le film que je réalise pour Gato Heroi, à l'aide des collègues de Gato
Bask....
The board is chambered foam (offcuts of floor insulation), hence the heavy
glass job. Double lapped rails, translucent red tint with full on black
dipped n...
This is my personal board built in 2010. It's 9'6" long, 22 1/2" wide, 18"
nose, 16" tail and 3" thick. The rails are pinched. It's in like new
conditio...
How to build this fin:
I love classic D fins on my longboards. Couldn't find any from suppliers so
I dug around and found a really cool post on Swaylocks b...
World Cup 2014 Top Goalscorer
The preliminary qualifying spherical for the 2014 FIFA World Cup Brazil
sparked unprecedented interest from Asian media, wi...
Last year I had the pleasure of meeting a new friend and colleague,
David Town. David is from Bend Oregon. The day we met, David had been
surfing at S...
SO HERE IS MY NEW BLOG. WWW.FREE-RADICALS.TV
From herein , this will be the place where both myself and Richard Kenvin
of Hydrodynamica.blogspot.com combi...
Another aeon since I posted anything, the excuse the best I could possibly
have is all energies are being directed at projects outside of blogland.
Gone a...
Sometimes you just have to take some risks. They say no risk, no reward.
Well here goes nothing. Over the summer I made some very big life
decisions. I dec...
Here is a SUP inspired surfboard. A customer who owns a IsIs wanted to
build a board that rode like his IsIs but wider and thicker with less
length. This...
10th July 2013: the last post in Just Bonzers…
I started the blog as a very respectful doffing of my cap to Malcolm and
Duncan’s bonzer designs which inspi...
The project is nearly done, and just in time as well as my wife is due to
have our 2nd child this week. Here Peter Mo and I are adding the epoxy
glass to...
Hi Guys ...well the finless is glassed and in the drink....I've been away
on a private yacht charter with a couple of mates to xxxxxx..for a couple
of week...
SINCE I HAVEN'T BEEN ON A SURF TRIP IN YEARS IVE BEEN GOING THROUGH ALL THE
PICS IVE TAKEN ALONG MY MANY ADVENTURES. I HOPE YOU ENJOY THEM !
RIDING AN 8 F...
Summers been a busy one with hardly any time to keep up with the heaps of e
mails let alone keep on top of the blog.
Here the baggage monkeys have been at ...
I got this e-mail from my best friend last night. This event is being held
in Cardiff on Friday night. This handplane along with another will be there
for ...
We are re-designing with the website more content and new updates. The new
site will be launched later this summer. Check out my Facebook page for new
boar...
Right after the last post, exactly that day, life went into a tailspin from
which I have not yet fully emerged. Loss, grief, regret, financial
catastrophe ...
BP is using a chemical produced by its corporate partner to clean up the
spill, even though it has been banned by the EPA...Oddly one of the former
executi...
This blog is now located at http://foamez.blogspot.com/.
You will be automatically redirected in 30 seconds, or you may click here.
For feed subscribers, p...
Retro Single fin based on an original Stewart Board (from St Ives not
California) custom handmade glass-on Flex fin.
Another commitioned Retro single fi...


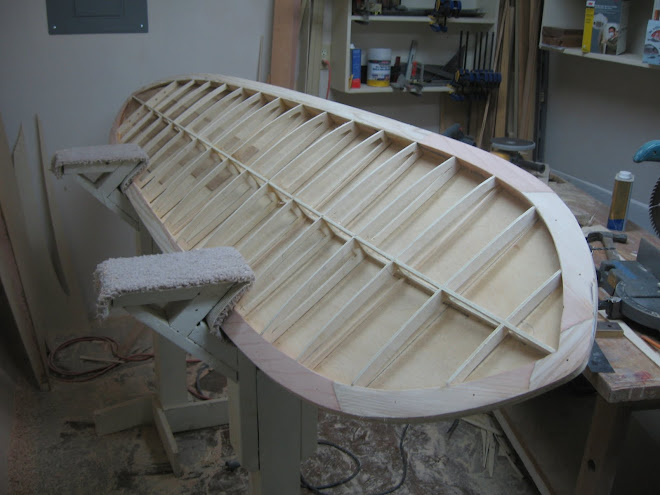


 I cut the rails down, now I've decided to add some ribs and a stringer - the skin is just too "flexy" as it is. At least on the 7'6" hybrid. On the fish, I might still try to get away without ribs.


.jpg)


