Thursday, January 21, 2010

closet pole dowels for fcs plugs


I used closet pole dowel to anchor the fcs fin plugs.

upper deck begun


bottom decked


double decker


Next, after the rails were beveled, came the decks, top and bottom. Unlike most hws builders, I did not glue my decks up on a flat bench then bend them to fit the board. I built the decks on the board, so each piece could bend as it was glued. It just made more sense to me, to do it that way, even 'tho it was a bit time-consuming! I used some creative license to improvise as I went along.


Tuesday, January 19, 2010

ok, here's the video on the rails...

video odd-e-o

I can NOT get this video to embed or upload! Arrrgghh! So anyways, you have the link.

the bevel made me do it!


Cutting the bevel on the top of the rails was a little tricky. I made a video that kinda explains it. You can see it on YouTube at http://www.youtube.com/watch?v=c0yIl2IzxP0

Jethro, clamp it!


This part of the process uses a lot of little clamps!

plank-ton


Unlike a lot of people who glue their planks together on a flat workbench, then bend the whole thing over the frame, I built my bottom deck on the board itself, piece-by-piece. I don't know any reason why this would be better, and in fact I'm sure its slower, but its just what I decided to do. I just didn't like the thought of bending the whole assembly after it was glued flat!

hole-y surfboard frame, batman!


I drilled holes in the ribs, and freehand routered some of the rails away, in order to lighten things up a bit.

flange-ulence


Once I had my ribs shaped and glued in place, I added a top flange to each one, for extra strength. These proved really helpful when glueing my top planks, since it gave me something to clamp to. The ribs were made in two halves that met at the stringer, but running the flanges over the top continuous really tied everything together very strong.

close up and personal


here's a closer look at my shaping stand design

I can't stand it!


At this point, I needed some shaping stands. I searched photos on the internet, and saw a variety of different approaches. I finally designed my own, set up to hold the board flat, on edge, or at an angle. I painted them, and stapled some carpet remnants on to protect the board. They have worked out excellent! The only thing that I think would improve them, which I am planning to do with my next board, is add some bracing that ties them to each other.


taking a ribbing


In order to shape the deck, I needed ribs. So I cut some 1/8" plywood to size, and dry-fitted the ribs before cutting the curved top shape into each one.


fish bones!


So I had basically rough-shaped the bottom half of my board. I planned on adding some subtle concaves, and of course the rails would need to be shaped, but that would be done once the planking was on.


So it was time to focus on the rough shape of the top next.


Notch-O Libre


Next, I added a stringer and some cross-pieces at the bottom, which were notched into the rails. This added a lot of strength, and began to define the eventual shape of the board.

Rocker on George, for Ringo one time!


I built my rails, and cut my rocker into the bottom of the rails. Now it was beginning to take the fluid shape of a surfboard.

Rocker - the curve of the board from front to back - is an important aspect of surfboard design. It will affect paddling, wave-catching ability, turning, and negotiating steep drops.

Everything is a compromise - there is no one "best" rocker profile, you just have to find what works best for your board, your waves, and yourself.

Sunday, January 17, 2010

cutting compound curves


Compound curves are often cut on a bandsaw, when building furniture with curved legs, for example. If you know how its done, you understand the principle behind "bahrman rails". click here for a glimpse of what I'm referring to. Except I use a circular saw, jigsaw, and japanese pull-saw, not a bandsaw.

I started with my plan shape (template), and my lengthwise rocker profile (stringer shape). I decided my ribs would be 5" o.c. - closer than most other boards I'd seen, but stronger too.

Once I had my template, I cut 1.5" wide rail pieces from a redwood 2x6, and layered them vertically so that I could cut a rail with rocker from them. The key is using the rocker profile, with ribs marked every 5", and using those marks to correlate with the same rib layout on the rails.

the longest journey begins with a shortage of excuses


This blog is an offshoot of my "retro-surfer" blog, about my venturing back into the lineup after many years away.

In late summer of '09 I got back into surfing - after a 23 year hiatus! My first new board at that point was a retro fish I bought for $300 on ebay, and I was disappointed to find it, and all the boards in the warehouse/showroom where I picked it up, were made in a Chinese factory by workers who didn't surf. I still remember the time when surfboards were built and sold by surfers! Despite the nice Chinese sales girl I spoke with, I had visions of a child-labor sweatshop back in her homeland.

So I decided to look into the possibility of building my own surfboard. I did some research on internet, and discovered there were kits and plans available. But some were pricey, and most I didn't really like the shape.

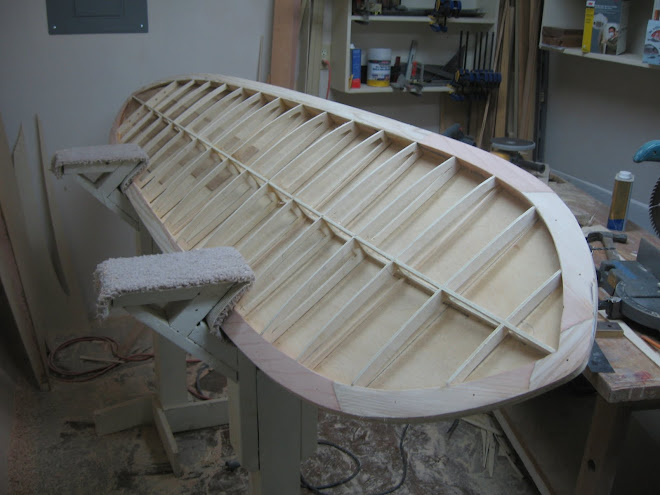
I decided to design my own, based on my foam retro-fish, and build it from scratch, using as much wood from my inventory as possible. My system is original, its "rails-first", meaning the rails are the first thing built and then the board structure is added. I call it "bahrman rails", and I'm in the middle of building my third board with this system.

I found an internet forum, tree-to-sea*, about hollow wooden surfboards. I joined, and began asking questions. Most hollow wooden surfboards are built around a model-airplane wing type structure, and I had a lot of experience building model airplanes as a kid.


* the original tree-to-sea site has been largely abandoned, although it is still there. The site has moved to a new web location, with lots of buttons, bells, and whistles, that I find confusing to negiotiate. Hence, I also set up an "alternative surfcraft" forum, with the hopes that others who desired a simple straightforward forum might gravitate there to share, learn, and teach.